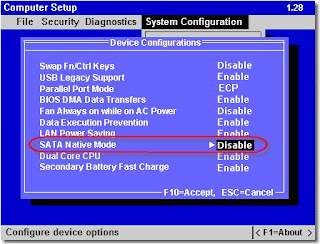
So I read and read for days about how to slipstream the SATA drivers into the XP install CD, otherwise you just get a harddisk cannot be found during the standard insatll. This was before I bought an external floppy, extracted the drivers from the HP site onto it and then did the famous F6 during the installlation to specify other drivers. I though hey presto I'm there, only to find that the second time the installation requests them the drive is not found. It turns out the Windows only accepts a handfull of external floppies, and guess what, mine was NOT on the list :(
So after 4 failed CD burns I finally get the installation in. Whoooo.... but on reboot, I get a flash of a BSOD and the system just keeps rebooting. SO I contact HP, cos by now I'm going mad. They tell me to install with native SATA disabled and then put the drivers on and then switch it back on. So here's how to do it:-
1. Set Native SATA to DISABLED then install the OS in the normal fashion.

2. Download the latest “Intel Matrix Storage Manager” driver.
After downloading the “Intel Matrix Storage Manager” create one folder named Sata and copy the iata61_enu.exe which you just downloaded from above mentioned link.
3. Use following command to extract the driver files:
c:\sata\ iata61_enu.exe -a -a -pc:\sata
When run, the installation process begins; simply click through the dialogs as prompted. This will not install the driver, it will only extract the driver files to
4. Install the Intel chipset driver for example "sp32781. Intel Chipset Inst Utly for ICH7 .7.2.2.1006 REV_ A.txt"
5. Update the ICH-7 controller that was just added from the chipset driver

6. Here are the steps for walking through the wizard.
8. Change the BIOS settings back to Native SATA ENABLED and REBOOT once again.
9. After reboot, the additional SATA components will be updated and allow you to enter Windows normally and you will be prompted to reboot again:.
10. Finally you will have the driver completely installed


3 comments:
Thx for this tip!
Rescued me before a suicide.
/martin@denmark
Well I spent days trying to slipstream and was going crazy!!! So I know how you feel. Glad I saved a life :)
Thank you!! This helped.
Post a Comment