I had a client bring over his laptop saying that the sound was really quiet, even with the volume pumped up to the max!! Then he said perhaps it's because there is only sound coming from one speaker. I thought that one speaker had gone so I plugged in some headphones and sure enough both worked and balance shifted the sound from one ear to the other. However on the built in speakers it had no effect. I thought, hmm looks like a mono speaker system, but who makes them now a days?? Well checking the HP site here, confirms stereo mic and headphones but MONO built in speaker, what the heck!! So I guess the moral is always check the small print!!
Showing posts with label Hardware. Show all posts
Showing posts with label Hardware. Show all posts
Sunday, March 16, 2008
Low audio volume on HP 6820s laptop
I had a client bring over his laptop saying that the sound was really quiet, even with the volume pumped up to the max!! Then he said perhaps it's because there is only sound coming from one speaker. I thought that one speaker had gone so I plugged in some headphones and sure enough both worked and balance shifted the sound from one ear to the other. However on the built in speakers it had no effect. I thought, hmm looks like a mono speaker system, but who makes them now a days?? Well checking the HP site here, confirms stereo mic and headphones but MONO built in speaker, what the heck!! So I guess the moral is always check the small print!!

Saturday, October 27, 2007
Toshiba Satellite A200 runniing Windows Vista - Built in Webcam stopped working
Although this had nothing to do with with Microsoft Anytime I was getting the following message:
When you select Start Camera in the Camera Assistant software you may see this error message: "Please turn on the Camera".
After wasting half an hour trying to reinstall the driver, down load the orignal software etc, I stumbled across the soltuion on the Toshiba site:
Firstly
Re-install the driver for the webcam.
Then Follow these steps to re-install the driver for the webcam.
You will need to be logged in as an Administrator or have an Administrator password ready.
1. Click the Windows Start button.
2. Click Control Panel, System and Maintenance and then Device Manager.
3. Right-click on Chicony USB 2.0 Camera and select Update Driver Software. A yellow exclamation point indicates that the camera is recognized by Windows but is not working properly, probably because of problem with the device driver
4. Select Browse my computer for the driver software.
5. Select Let me pick from a list of device drivers on my computer.
6. Select USB Video Device from the list, and click Next.
7. If the message “Windows encountered a problem installing the driver software for your device” appears, click Close.
8. Restart Windows.
The webcam should now work properly.
When you select Start Camera in the Camera Assistant software you may see this error message: "Please turn on the Camera".
After wasting half an hour trying to reinstall the driver, down load the orignal software etc, I stumbled across the soltuion on the Toshiba site:
Firstly
Re-install the driver for the webcam.
Then Follow these steps to re-install the driver for the webcam.
You will need to be logged in as an Administrator or have an Administrator password ready.
1. Click the Windows Start button.
2. Click Control Panel, System and Maintenance and then Device Manager.
3. Right-click on Chicony USB 2.0 Camera and select Update Driver Software. A yellow exclamation point indicates that the camera is recognized by Windows but is not working properly, probably because of problem with the device driver
4. Select Browse my computer for the driver software.
5. Select Let me pick from a list of device drivers on my computer.
6. Select USB Video Device from the list, and click Next.
7. If the message “Windows encountered a problem installing the driver software for your device” appears, click Close.
8. Restart Windows.
The webcam should now work properly.
Saturday, July 7, 2007
Wireless Presenter Notebook Mouse 8000

OK so secretly I'm a bit of a hardware/gadegt junky, but this something I could really use (hint, hint for Christmas please, since I can't wait until my birthday) I really like the laser pointer, good for lectures/training. But the media Center edition controls make me feel like I'm on an i-Mac :) Take a virtual tour here.

Saturday, June 30, 2007
Triple/dual booting with Vista and Linux
I just got a 160GB SATA HDD for my Compaq nc8430 and of course I want to run all three OS's
Windows XP to get work done,
Vista to mess about and show off for now,
Linux to just play around.
Now some distros of Linux allow you to install the GRUB bootloader on the actual partition of the installation. This is great because:
1. Vista has already taken over the MBR and thus installin this after linux will render linux unbootable.
2. I know how to BCEdit better than I do GRUB :)
Luckily I found these guides which are idiot proof and so well documented.
The definitive dual-booting guide: Linux, Vista and XP step-by-step
But most especially this one:
How to dual-boot Vista with Linux (Linux is already installed)
Now although I put XP on first then Vista and then Fedora 7 I did put the GRUB on the Linux partition and so this is my set up :)
Windows XP to get work done,
Vista to mess about and show off for now,
Linux to just play around.
Now some distros of Linux allow you to install the GRUB bootloader on the actual partition of the installation. This is great because:
1. Vista has already taken over the MBR and thus installin this after linux will render linux unbootable.
2. I know how to BCEdit better than I do GRUB :)
Luckily I found these guides which are idiot proof and so well documented.
The definitive dual-booting guide: Linux, Vista and XP step-by-step
But most especially this one:
How to dual-boot Vista with Linux (Linux is already installed)
Now although I put XP on first then Vista and then Fedora 7 I did put the GRUB on the Linux partition and so this is my set up :)
Sunday, May 20, 2007
10 steps to a clean Install of Windows XP on HP nc8430 Laptop
If you are anything like me, when you get a new laptop all the extra stuff loaded on by the vendor will just bug you like crazy until you end up doing the inevitable.... a clean install. Well this was easier said than done in my case. Vista loaded like a dream, no time atall to install, but once loaded with VS2005 and SQL server and all my dev stuff, well my machine just could not take it. I guess I really need that 2GB of ram upgrade and a larger HDD, but that's another story.
So I read and read for days about how to slipstream the SATA drivers into the XP install CD, otherwise you just get a harddisk cannot be found during the standard insatll. This was before I bought an external floppy, extracted the drivers from the HP site onto it and then did the famous F6 during the installlation to specify other drivers. I though hey presto I'm there, only to find that the second time the installation requests them the drive is not found. It turns out the Windows only accepts a handfull of external floppies, and guess what, mine was NOT on the list :(
So after 4 failed CD burns I finally get the installation in. Whoooo.... but on reboot, I get a flash of a BSOD and the system just keeps rebooting. SO I contact HP, cos by now I'm going mad. They tell me to install with native SATA disabled and then put the drivers on and then switch it back on. So here's how to do it:-
1. Set Native SATA to DISABLED then install the OS in the normal fashion.
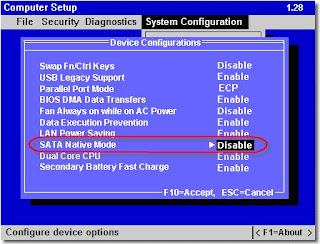
2. Download the latest “Intel Matrix Storage Manager” driver.
After downloading the “Intel Matrix Storage Manager” create one folder named Sata and copy the iata61_enu.exe which you just downloaded from above mentioned link.
3. Use following command to extract the driver files:
c:\sata\ iata61_enu.exe -a -a -pc:\sata
When run, the installation process begins; simply click through the dialogs as prompted. This will not install the driver, it will only extract the driver files to. After the extraction is completed, the driver files can be found in .
4. Install the Intel chipset driver for example "sp32781. Intel Chipset Inst Utly for ICH7 .7.2.2.1006 REV_ A.txt"
5. Update the ICH-7 controller that was just added from the chipset driver
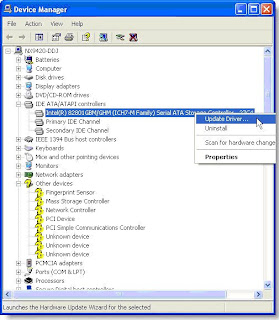
6. Here are the steps for walking through the wizard.
6a. No not this time
6b. Install form a list or specific location
6c. Don't Search, I will choose the driver to install
6d. Have disk
6e. Browse to C:\SATA\Driver
6f. Choose the 82801GMB SATA AHCI Controller
6g. Say yes, you do want to install although it is not signed
7. Reboot into the BIOS settings using the F10 function key as the system is coming up.
8. Change the BIOS settings back to Native SATA ENABLED and REBOOT once again.
9. After reboot, the additional SATA components will be updated and allow you to enter Windows normally and you will be prompted to reboot again:.
10. Finally you will have the driver completely installed
So I read and read for days about how to slipstream the SATA drivers into the XP install CD, otherwise you just get a harddisk cannot be found during the standard insatll. This was before I bought an external floppy, extracted the drivers from the HP site onto it and then did the famous F6 during the installlation to specify other drivers. I though hey presto I'm there, only to find that the second time the installation requests them the drive is not found. It turns out the Windows only accepts a handfull of external floppies, and guess what, mine was NOT on the list :(
So after 4 failed CD burns I finally get the installation in. Whoooo.... but on reboot, I get a flash of a BSOD and the system just keeps rebooting. SO I contact HP, cos by now I'm going mad. They tell me to install with native SATA disabled and then put the drivers on and then switch it back on. So here's how to do it:-
1. Set Native SATA to DISABLED then install the OS in the normal fashion.

2. Download the latest “Intel Matrix Storage Manager” driver.
After downloading the “Intel Matrix Storage Manager” create one folder named Sata and copy the iata61_enu.exe which you just downloaded from above mentioned link.
3. Use following command to extract the driver files:
c:\sata\ iata61_enu.exe -a -a -pc:\sata
When run, the installation process begins; simply click through the dialogs as prompted. This will not install the driver, it will only extract the driver files to
4. Install the Intel chipset driver for example "sp32781. Intel Chipset Inst Utly for ICH7 .7.2.2.1006 REV_ A.txt"
5. Update the ICH-7 controller that was just added from the chipset driver

6. Here are the steps for walking through the wizard.
8. Change the BIOS settings back to Native SATA ENABLED and REBOOT once again.
9. After reboot, the additional SATA components will be updated and allow you to enter Windows normally and you will be prompted to reboot again:.
10. Finally you will have the driver completely installed
Subscribe to:
Posts (Atom)