' Get the current Date Time and remove illegal chars
Dim strDTStamp As String = Format(Date.Now, "yyyyMMddHHmmss")
' This is the file we want to rename
Dim of As String = "C:\Myfile.txt"
' Insert DTStamp into the old name
Dim nf As String = of.Replace(".", strDTStamp & ".")
' Moving the file is like renaming it
System.IO.File.Move(of, nf)
Wednesday, May 30, 2007
Resizing images/bitmaps the Visual Studio 2005 Way!
I've see so many ways to do this but this is so elegant it rocks. Here's how to resize an image in VB.NET 2005
The delegate ThumbNailAbort is necessary, even if it is not yet implemented yet in .NET
Private Sub Button1_Click(ByVal sender As System.Object, ByVal e As System.EventArgs) Handles Button1.Click
   Dim MyImage As New Bitmap("D:\My Documents\My Pictures\untitled.bmp")
   Dim MyThumbNail As Image
   MyThumbNail = MyImage.GetThumbnailImage(MyImage.Width/2, MyImage.Hieght/2, AddressOf ThumbNailAbort, Nothing)
   MyThumbNail.Save("D:\My Documents\My Pictures\Thumb.bmp")
End Sub

Private Function ThumbNailAbort() As Boolean
   'Do Nothing Here
End Function
The delegate ThumbNailAbort is necessary, even if it is not yet implemented yet in .NET
Tuesday, May 29, 2007
Hiding Tabs ain't the same anymore
If you are like me and remember VB6 all too well this code would appear to be the logical way to hide a tab:
TabControl1.TabPages(1).Visible = False
Now althought this compiles it does nothing
What's stranger is that:
TabControl1.TabPages(1).Enabled = False
does work as expected!!
So the only way is to remove it. But don't worry it does not unload it from memory so we can always add it back into the tabpages collection to get it back:
TabControl1.TabPages.Remove (TabPage1) or RemoveAt(index)
and
TabControl1.TabPages.Add(TabPage1)
to get it back. What's more make sure you use the object as the parameter and not a string :)
Hiding a file in .NET 2005 and other tricks
Really easy:
File.SetAttributes("" & strFileName & "", FileAttributes.ReadOnly + FileAttributes.Hidden + FileAttributes.System)
Make sure you import System.IO
File.SetAttributes("" & strFileName & "", FileAttributes.ReadOnly + FileAttributes.Hidden + FileAttributes.System)
Make sure you import System.IO
Sunday, May 20, 2007
10 steps to a clean Install of Windows XP on HP nc8430 Laptop
If you are anything like me, when you get a new laptop all the extra stuff loaded on by the vendor will just bug you like crazy until you end up doing the inevitable.... a clean install. Well this was easier said than done in my case. Vista loaded like a dream, no time atall to install, but once loaded with VS2005 and SQL server and all my dev stuff, well my machine just could not take it. I guess I really need that 2GB of ram upgrade and a larger HDD, but that's another story.
So I read and read for days about how to slipstream the SATA drivers into the XP install CD, otherwise you just get a harddisk cannot be found during the standard insatll. This was before I bought an external floppy, extracted the drivers from the HP site onto it and then did the famous F6 during the installlation to specify other drivers. I though hey presto I'm there, only to find that the second time the installation requests them the drive is not found. It turns out the Windows only accepts a handfull of external floppies, and guess what, mine was NOT on the list :(
So after 4 failed CD burns I finally get the installation in. Whoooo.... but on reboot, I get a flash of a BSOD and the system just keeps rebooting. SO I contact HP, cos by now I'm going mad. They tell me to install with native SATA disabled and then put the drivers on and then switch it back on. So here's how to do it:-
1. Set Native SATA to DISABLED then install the OS in the normal fashion.

2. Download the latest “Intel Matrix Storage Manager” driver.
After downloading the “Intel Matrix Storage Manager” create one folder named Sata and copy the iata61_enu.exe which you just downloaded from above mentioned link.
3. Use following command to extract the driver files:
c:\sata\ iata61_enu.exe -a -a -pc:\sata
When run, the installation process begins; simply click through the dialogs as prompted. This will not install the driver, it will only extract the driver files to. After the extraction is completed, the driver files can be found in .
4. Install the Intel chipset driver for example "sp32781. Intel Chipset Inst Utly for ICH7 .7.2.2.1006 REV_ A.txt"
5. Update the ICH-7 controller that was just added from the chipset driver
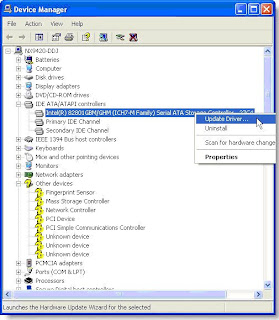
6. Here are the steps for walking through the wizard.
6a. No not this time
6b. Install form a list or specific location
6c. Don't Search, I will choose the driver to install
6d. Have disk
6e. Browse to C:\SATA\Driver
6f. Choose the 82801GMB SATA AHCI Controller
6g. Say yes, you do want to install although it is not signed
7. Reboot into the BIOS settings using the F10 function key as the system is coming up.
8. Change the BIOS settings back to Native SATA ENABLED and REBOOT once again.
9. After reboot, the additional SATA components will be updated and allow you to enter Windows normally and you will be prompted to reboot again:.
10. Finally you will have the driver completely installed
So I read and read for days about how to slipstream the SATA drivers into the XP install CD, otherwise you just get a harddisk cannot be found during the standard insatll. This was before I bought an external floppy, extracted the drivers from the HP site onto it and then did the famous F6 during the installlation to specify other drivers. I though hey presto I'm there, only to find that the second time the installation requests them the drive is not found. It turns out the Windows only accepts a handfull of external floppies, and guess what, mine was NOT on the list :(
So after 4 failed CD burns I finally get the installation in. Whoooo.... but on reboot, I get a flash of a BSOD and the system just keeps rebooting. SO I contact HP, cos by now I'm going mad. They tell me to install with native SATA disabled and then put the drivers on and then switch it back on. So here's how to do it:-
1. Set Native SATA to DISABLED then install the OS in the normal fashion.

2. Download the latest “Intel Matrix Storage Manager” driver.
After downloading the “Intel Matrix Storage Manager” create one folder named Sata and copy the iata61_enu.exe which you just downloaded from above mentioned link.
3. Use following command to extract the driver files:
c:\sata\ iata61_enu.exe -a -a -pc:\sata
When run, the installation process begins; simply click through the dialogs as prompted. This will not install the driver, it will only extract the driver files to
4. Install the Intel chipset driver for example "sp32781. Intel Chipset Inst Utly for ICH7 .7.2.2.1006 REV_ A.txt"
5. Update the ICH-7 controller that was just added from the chipset driver

6. Here are the steps for walking through the wizard.
8. Change the BIOS settings back to Native SATA ENABLED and REBOOT once again.
9. After reboot, the additional SATA components will be updated and allow you to enter Windows normally and you will be prompted to reboot again:.
10. Finally you will have the driver completely installed
Wednesday, May 16, 2007
Office shortcut keys
I've been doing a bit of office spreadsheet reporting these last few days and it was driving me bonkers to prepare the format the way I wanted it. What I had to do was basically highlight certain rows and delete them over and over. Now on a laptop infront of TV you could really do with shortcut keys and not the the old mouse. So I did a quick search and came up with:
Highlight Row => "Shift" + Spacebar
Highlight Column => "Ctrl" + Spacebar
To insert a row, hit "Ctrl + '+'"
To delete a row, hit "Ctrl + '-'"
Some others whilst I'm at it:
Ctrl+9 Hide Cell
Shift+Ctrl+9 Unhide The cell
Ctrl+0 Hide the Column
Shift+Ctrl+0 Unhide The Column
For the complete list for keyboard junkies visit:
www.exceltip.com
Monday, May 7, 2007
HP Pavillion t3000 desktop PC automatically restarts after immediately shutdown
Had a strange problem the other day, the PC was shutting down and then rebooting straight away. So the poor PC owner was waiting until the exact momment between safe shutdown and restart to power off the PC. After a little digging, that did not turn up much from the event log etc, I decided to turn off the windows feature that automatically reboots the machine after a critical error occurs. This can be found under control panel, system, Advanced tab, Startup and recovery options. With this in place, a shutdown revealed a STOP error on a BSOD. "STOP 0x000000D1 IRQL_NOT_LESS_OR_EQUAL Kbdclass.sys" Error Message When You Try to Shut Down the Computer So now it was quite obvious that the mouse driver need upgrading because it happened to be a logitech mouse. Problem solved ;)
Subscribe to:
Posts (Atom)


